What to Carry on a Bike When You Have Errands to Run
Plan an errand load around the bike, the purchases, and the stops. Learn where to put essentials, how to handle awkward items, and when to change the plan.
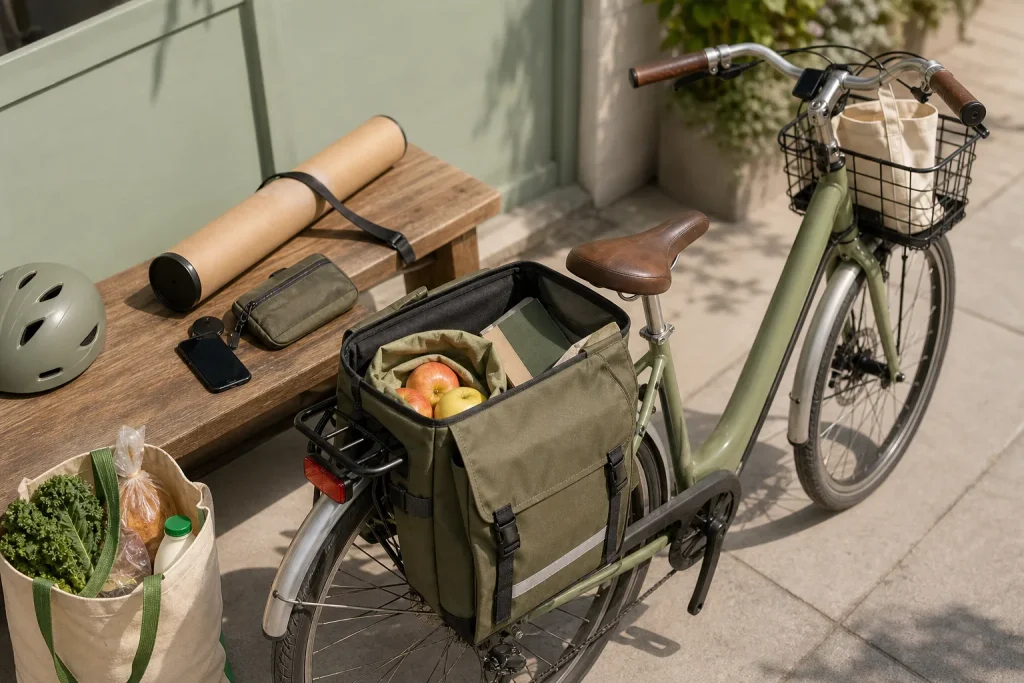
A folded poster tube, a library book, and a bag of apples create a different carrying problem from a few small groceries. Before setting off, decide which items must stay flat, which can move around, and whether the bike has a secure place for each one. A sensible plan starts with the cargo, not with the biggest bag you can find.
For an errand ride, aim to keep the controls clear, the load secured, and essential items easy to retrieve while stopped. If something does not fit safely, change the transport plan rather than improvising with a loose bag on the handlebars.
Match the carrier to the shape of the load
A rear rack with a compatible pannier suits many everyday purchases. It keeps cargo off your back, but the pannier must attach firmly and stay clear of the wheel, brakes, and other moving parts. Check the rack and bicycle maker’s guidance if you are unsure about fit or carrying limits.
A backpack is useful when you need to bring the whole bag inside, but a bulky or lopsided load can be uncomfortable and may shift as you ride. Keep hard items from pressing into your back. A front basket can carry a small, contained load, provided it does not block lights or interfere with steering. Do not hang an ordinary shopping bag from a handlebar: it can swing into a control or pull the bike off line.
For long or rigid items, consider whether they can be carried without extending into the rider’s path or affecting steering. A poster tube, for instance, may not fit safely in a standard pannier. If it cannot be secured to a carrier designed for that purpose, use another transport option.
Separate essentials from purchases
Keep phone, wallet, keys, and any lock key in closed pockets or a small removable pouch. Take valuables with you when leaving the bike. Put a reusable shopping bag where it is easy to reach while stopped, not loose on top of the load.
Give each purchase a place. Protect papers and books from rain and bending. Separate leak-prone items from electronics or documents, and use a soft layer to stop rigid objects from knocking against fragile ones. Place heavier items low and close to the bike where the carrier allows it. Leave enough room for the bag to close fully; a strained flap or dangling strap is a sign to repack.
Check each item and choose what happens next
- Carrier fit: Check that hooks, straps, or fasteners sit securely on the rack. If the carrier shifts or does not fit, use a compatible carrier or make another transport plan.
- Wheel and brake clearance: Look for fabric, straps, or cargo near the wheel and brakes. If anything can catch, reposition or remove it before riding.
- Control access: Turn the handlebar and check that bags do not block lights, cables, or steering. If they interfere, move the load to another carrier.
- Closure: Check that every bag closes without strain. If it will not close, remove items or choose a larger suitable carrier.
- Fragile and wet items: Check whether papers, electronics, or breakables are exposed to rain or leaks. If they are, add a protective sleeve or separate sealed bag.
- Load balance: Check that cargo is not loose, stacked high, or gathered on one side. If the bike feels awkward during a cautious ride in a safe place, stop and rearrange or reduce the load.
- Stop access: Check whether you can retrieve the item needed at the next stop without unpacking everything. If not, move it to a closed, reachable pocket while parked.
Change the plan when a purchase will not fit
At a shop, pause before adding an unexpected item. Check its shape, whether it might leak or break, and whether the loaded carrier can still close and remain clear of the wheel. Do not carry a bulky item under one arm or attach a loose bag to the handlebars just to get home.
If the purchase does not fit, leave it for another trip, ask the shop about delivery, or use another way to transport it. A compatible larger pannier, rack bag, or trailer may help with recurring bulky errands, but check the carrier’s fit and guidance before use.
A hypothetical worked example with an awkward purchase
Starting inputs: Imagine a rider named Jo planning to return a library book and buy groceries. Jo has a rear rack, a fitted pannier, a reusable shopping bag, and a poster tube to collect from a print shop. These are invented details. The tube is too long to fit inside the pannier, and Jo has no purpose-built way to secure it.
Step one: Jo puts the book in a protective sleeve and places it flat inside the pannier. The phone, wallet, and keys go in a zipped pouch that Jo can take indoors.
Step two: Jo checks the poster tube against the bike while parked. It would extend beyond the pannier and cannot be secured without interfering with steering or the rider’s position. Jo decides not to carry it on the bike.
Step three: Jo completes the library return, buys only groceries that fit in the pannier, and checks that the bag closes with all straps tucked away. The resulting decision is to collect the tube on another trip or arrange delivery. Jo gets home with a manageable grocery load, but gives up the convenience of collecting everything in one ride.
Recheck the setup after every stop
Purchases change the shape and balance of a load. After adding or removing an item, close the bag, tuck away loose straps, and check that nothing can reach the wheel or controls. Take a cautious ride in a safe area before entering busy traffic; if the bike feels difficult to steer or the load shifts, stop and rearrange it.
Keep the plan flexible. A second trip or another transport method is a useful choice when an item cannot be carried securely. The best errand setup is the one that fits the bike and the actual cargo, including the awkward item you did not expect.
More useful reads
How to Make a Short Bike Ride Easier to Repeat
Build a small cycling habit around an existing commitment, a simple route, and preparations that make…
The Simple Bicycle Checks Worth Learning
Choose between a quick pre-ride scan, a focused observation, or a mechanic’s inspection—and learn when a…